
Mercedes Sprinter SL101 Window Installation Guide | Driver Side Forward
Published by VWD on Oct 2nd 2026
Mercedes Sprinter SL101 Driver Side Forward Window Installation Guide
Step-by-step Mercedes-Benz Sprinter SL101 installation guide covering SL101-AW, SL101-CA, SL101-DS, SL101-F, SL101-SE, and SL101-SER driver side forward windows.

Table of Contents
What Is the Mercedes Sprinter SL101 Window Position?
The SL101 window position is the driver side forward body section of the Mercedes-Benz Sprinter.
This is the large window opening directly behind the driver's front door. The SL101 family is designed to follow the factory Sprinter body stamping and provide an OE-style exterior appearance.
Mercedes Sprinter SL101 Fitment
The SL101 family is designed for compatible 2007–2026 Mercedes-Benz Sprinter vans in the driver side forward position.
General fitment includes:
- Vehicle: Mercedes-Benz Sprinter Van
- Model Years: 2007–2026
- Roof Height: Low Roof or High Roof
- Position: Driver Side Forward
Wheelbase compatibility varies by model:
- SL101-AW: 144" or 170"
- SL101-CA: 144", 170", or 170EXT
- SL101-DS: 144" or 170"
- SL101-F: 144" or 170"
- SL101-SE: 144" or 170"
- SL101-SER: 144" or 170"
The common overall dimensions for the current SL101 models are approximately 1402 mm x 777 mm, or approximately 55.20" x 30.6".
Available SL101 Window Models
SL101-AW Premium Awning Window
The SL101-AW is the premium awning-style option for the Sprinter driver side forward position.
It provides outward-opening ventilation while maintaining a clean all-glass exterior appearance.
Shop SL101-AW Premium Awning Window
SL101-CA Crank-Out Awning Window
The SL101-CA uses a controlled crank-out awning design for adjustable ventilation.
Current specifications list a crank-out distance of up to approximately 76 mm (3").
SL101-CA is also the SL101 model currently listed for 144", 170", and 170EXT Sprinter wheelbases.
Shop SL101-CA Crank-Out Awning Window
SL101-DS Double-Sliding Window
The SL101-DS provides two independently sliding glass panels for increased ventilation control.
The front panel, rear panel, or both panels can be opened depending on airflow needs.
Shop SL101-DS Double-Sliding Window
SL101-F Fixed Glass Window
The SL101-F is the solid fixed-glass option for the driver side forward position.
It provides a simple OE-style appearance without sliders, hinges, or opening hardware.
Shop SL101-F Fixed Glass Window
SL101-SE SE-Series Sliding Window
The SL101-SE is a half-slider configuration designed to provide controlled ventilation with an integrated bug screen.
Current specifications list a slider opening of approximately 520 mm x 530 mm, or roughly 20.47" x 20.87".
SL101-SER Rear-Opening Sliding Window
The SL101-SER uses a rear-opening half-slider configuration.
This provides another airflow option while maintaining the clean Sprinter-specific exterior glass shape.
Current specifications list an opening of approximately 520 mm x 530 mm, or roughly 20.47" x 20.87".
Shop SL101-SER Rear-Opening Sliding Window
Tools and Materials Needed
- One-handed reciprocating saw, pneumatic air saw, or compact body saw
- Thin-metal automotive cutting blade
- Metal file or deburring tool
- Safety glasses
- Work gloves
- Vacuum
- Clean shop cloth
- Automotive primer or appropriate urethane primer
- Trim-Lok edge molding
- Automotive glass urethane
- High-ratio urethane gun
- Window-support or securing tape
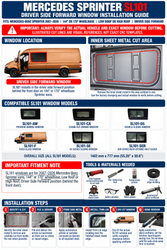
Mercedes Sprinter SL101 Driver Side Forward Cutout Overview
The illustrated red line identifies the general inner sheet-metal area that must be removed from the Sprinter driver side forward window pocket.
The factory Sprinter stamping provides the primary visual reference. Use the illustrated guide together with the actual SL101 window before making a permanent cut.
After cutting, the opening should be:
- Filed smooth
- Deburred
- Protected against corrosion
- Finished with Trim-Lok edge molding
- Vacuumed and cleaned
- Dry-fit with the actual SL101 window before urethane is applied
Step-by-Step Mercedes Sprinter SL101 Window Installation
Step 1 — Verify the Driver Side Forward Position
Confirm that you are working on the driver side forward body section directly behind the driver's front door.
Before cutting, inspect the inside of the van for:
- Electrical wiring
- Factory brackets
- Insulation
- Interior wall systems
- Aftermarket accessories
- Any components that could interfere with the cut
Step 2 — Identify the Inner Sheet Metal to Remove
Use the factory stamped opening and illustrated red line to identify the approximate inner sheet-metal area requiring removal.
Compare the opening with the actual SL101 window before making the first cut.
Step 3 — Cut From Inside the Van When Possible
Whenever practical, perform the cutting operation from inside the Sprinter.
This provides better visibility of the factory stamping and helps reduce the chance of damaging the exterior body surface.
Suitable cutting tools include:
- One-handed reciprocating saw
- Pneumatic air saw
- Compact automotive body saw
Use a blade intended for thin automotive sheet metal and make controlled cuts.
Step 4 — Remove the Cut Sheet-Metal Section
Once the perimeter is completely cut, carefully remove the unwanted inner sheet-metal section.
Inspect the opening for:
- Remaining tabs
- Saw burrs
- Sharp corners
- Raised metal
- Irregular cutting areas
Step 5 — File and Deburr the Opening
Use a hand file or deburring tool around the entire cut perimeter.
Remove sharp points, burrs, lifted edges, and high spots.
The finished metal edge should be smooth enough that it does not interfere with the window or Trim-Lok molding.
Step 6 — Protect the Raw Steel
Freshly cut automotive steel should not remain exposed.
Apply an appropriate corrosion-protection coating to all raw metal.
Suitable options may include:
- Automotive rattle-can primer
- Automotive touch-up primer
- Urethane-compatible primer where appropriate
Allow the coating to dry or flash according to the manufacturer's instructions.
Install Trim-Lok Edge Molding
Once the opening has been cut, deburred, and protected, install Trim-Lok edge molding over the finished sheet-metal edge.
Trim-Lok helps:
- Cover the cut sheet-metal edge
- Protect against sharp exposed metal
- Improve the interior appearance
- Conceal minor cutting irregularities
- Create a cleaner finished opening
Trim Reference: Use a close-up view of the actual Trim-Lok installation to demonstrate how the molding should fully seat over the finished sheet-metal edge.
Step 7 — Clean the Body Cavity
Vacuum the opening and surrounding wall cavity thoroughly.
Small steel fragments left behind can eventually rust or create debris inside the wall.
Step 8 — Dry-Fit the Actual SL101 Window
Before applying automotive urethane, place the exact SL101-AW, SL101-CA, SL101-DS, SL101-F, SL101-SE, or SL101-SER into the prepared opening.
Inspect the entire perimeter for proper clearance.
The window should sit naturally in the intended body position without being forced against remaining inner sheet metal.
If interference exists:
- Remove the window
- Identify the contact point
- Carefully adjust the opening
- File and deburr the new cut
- Re-prime any newly exposed steel
- Reinstall Trim-Lok where required
- Dry-fit again
Urethane-Bonded SL101 Window Installation
Current SL101 models use a urethane-bonded installation.
Prepare the glass and vehicle bonding surfaces according to the specific automotive urethane system being used.
Preparation typically includes:
- Cleaning the vehicle bonding surface
- Cleaning the glass bonding surface
- Applying body primer where required
- Applying glass primer where required
- Allowing the proper primer flash time
Apply a continuous automotive glass urethane bead around the required bonding perimeter.
Avoid gaps, thin areas, or inconsistent bead height.
Because automotive urethane is much thicker than household caulk, a high-ratio urethane gun is generally recommended.
Step 9 — Set the SL101 Window
Carefully position the window into the prepared driver side forward opening.
Apply even pressure around the perimeter so the urethane makes consistent contact.
Tape or support the window during curing according to the adhesive manufacturer's requirements.
Do not drive the Sprinter until the urethane has reached the manufacturer's specified safe-drive-away time.
Common Mercedes Sprinter SL101 Installation Mistakes
Assuming Every SL101 Has Identical Wheelbase Fitment
Verify the specific product before ordering. Most current SL101 models list 144" and 170" compatibility, while SL101-CA additionally lists the 170EXT wheelbase.
Cutting Before Verifying the Actual Window
Always have the window available and verify the body opening before making permanent cuts.
Cutting Too Much Sheet Metal
Remove only what is required for proper clearance. An opening can be carefully enlarged after dry-fitting, but an oversized cut is difficult to correct.
Skipping the Dry Fit
Never apply urethane until the actual SL101 window has been test-fitted in the prepared opening.
Leaving Burrs Around the Opening
File the full perimeter so there are no sharp or raised areas.
Leaving Bare Steel Exposed
Protect freshly cut steel before final installation.
Leaving Metal Shavings Inside the Wall
Vacuum the entire opening and wall cavity thoroughly after cutting.
Using Household Caulk Instead of Automotive Urethane
SL101 windows are designed for automotive glass urethane bonding.
Shop Mercedes Sprinter SL101 Driver Side Forward Windows
SL101-AW Premium Awning Window
Shop SL101-AW
SL101-CA Crank-Out Awning Window
Shop SL101-CA
SL101-DS Double-Sliding Window
Shop SL101-DS
SL101-F Fixed Glass Window
Shop SL101-F
SL101-SE SE-Series Sliding Window
Shop SL101-SE
SL101-SER Rear-Opening Sliding Window
Shop SL101-SER
Van Window Installation Instructions
View Van Window Installation Instructions
Mercedes Sprinter SL103 Rear Quarter Installation Guide
View SL103 Installation Guide
Mercedes Sprinter SL104 Rear Quarter Installation Guide
View SL104 Installation Guide
Frequently Asked Questions
What position is SL101?
SL101 is the driver side forward window position directly behind the driver's front door on the Mercedes-Benz Sprinter.
What Sprinter years do SL101 windows fit?
Current Van Windows Direct SL101 listings cover 2007–2026 Mercedes-Benz Sprinter vans.
What wheelbases fit SL101?
SL101-AW, SL101-DS, SL101-F, SL101-SE, and SL101-SER currently list 144" and 170" fitment. SL101-CA also lists 170EXT.
Which SL101 models are available?
Current VWD SL101 options include SL101-AW, SL101-CA, SL101-DS, SL101-F, SL101-SE, and SL101-SER.
What size are SL101 windows?
Current overall dimensions are approximately 1402 mm x 777 mm, or roughly 55.20" x 30.6".
Should the SL101 opening be cut from inside the van?
When practical, cutting from inside provides a clear view of the Sprinter's inner factory stamping and helps reduce the chance of damaging the exterior body surface.
Should freshly cut steel be primed?
Yes. Freshly exposed steel should receive appropriate automotive corrosion protection before final installation.
Should Trim-Lok edge molding be installed?
Trim-Lok helps protect the finished sheet-metal edge and provides a cleaner interior appearance.
Should the SL101 window be dry-fitted before applying urethane?
Yes. Always verify proper clearance and positioning with the actual window before applying automotive urethane.
What adhesive is used to install SL101 windows?
Current SL101 models use a urethane-bonded installation with suitable automotive glass urethane.
Final Mercedes Sprinter SL101 Installation Notes
A clean Mercedes Sprinter SL101 installation requires careful preparation of the driver side forward body opening.
Verify the exact window and wheelbase, identify the correct body stamping, carefully cut the required inner sheet metal, file and protect all exposed steel, install Trim-Lok, remove metal debris, dry-fit the actual window, and then complete the urethane-bonded installation.
Whether you choose the SL101-AW, SL101-CA, SL101-DS, SL101-F, SL101-SE, or SL101-SER, always verify the actual Sprinter and exact window before making permanent modifications.