
Direct Fit Urethane Van Window Installation
Published by VWD on Nov 16th 2023
Urethane Bonded Van Window Installation Guide
Installing a urethane-bonded van window is one of the most popular methods used in modern camper van conversions. Many OEM-style windows for Mercedes-Benz Sprinter, Ford Transit, and Ram ProMaster vans use automotive urethane adhesives to create a clean, factory-inspired appearance while providing a durable, weather-resistant installation.
Whether you are replacing an existing factory window or adding windows to a cargo van for the first time, understanding the installation process can help improve results and reduce common installation mistakes.
This guide covers everything from preparing the cutout to applying urethane and positioning the window for a professional-quality installation.
What Is a urethane-bonded van window?
Unlike clamp-ring windows, which use a mechanical trim ring to secure the glass to the vehicle, urethane-bonded windows rely on automotive-grade urethane adhesive.
The adhesive forms both the structural bond and the weather seal between the vehicle body and the glass.
This installation method is commonly used because it provides:
- Clean OEM-style appearance
- No visible interior clamp ring
- Excellent weather resistance
- Strong adhesion
- Factory-inspired fit and finish
Most OEM-fit windows for Sprinter, Transit, and ProMaster vans are designed around this installation method.
Benefits of Urethane Bonded Windows
Urethane-bonded windows have become increasingly popular among van builders because they create a sleek appearance that closely resembles factory-installed glass.
Additional benefits include:
- Smooth exterior appearance
- No exposed mounting hardware
- Professional finished look
- Excellent long-term durability
- Compatibility with factory window openings
- Strong sealing characteristics
For many builders, the clean appearance alone makes urethane-bonded windows the preferred installation method.
OEM Window Openings and Factory Stampings
Most Mercedes-Benz Sprinter, Ford Transit, and Ram ProMaster vans contain factory-stamped window openings built into the vehicle body.
On the interior side of the van, these stamped areas are typically easy to identify because the inner sheet metal transitions around the perimeter of the future window location.
When installing OEM-fit windows, the stamped outline generally serves as the cut guide.
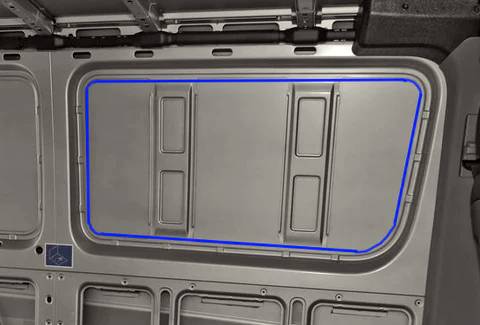
Using factory-stamped openings can significantly simplify installation because the vehicle manufacturer has already specified the intended window location.
Replacing an Existing Factory Window
Replacing a factory-installed window is often more involved than installing a window into an empty cargo panel.
Factory windows may use:
- Automotive urethane adhesives
- Factory trim systems
- Integrated seals
- Specialized mounting systems
Before ordering replacement windows, it is important to verify compatibility with your vehicle and any existing factory components.
Removing Existing Urethane-Bonded Glass
Removing factory glass typically requires specialized cutting tools designed for automotive window removal.
Professional glass installers often use:
- Wire cut-out systems
- Cold knives
- Power cut-out tools
- Automotive glass removal equipment
Care should be taken during removal to avoid damage to the vehicle body, paint, trim, and surrounding surfaces.
Preparing the Existing Opening
After removing the original window, any remaining urethane should be trimmed down as evenly as possible.
The goal is to create a clean bonding surface for the new installation.
Common cleaning products may include:
- Automotive adhesive cleaners
- Rubbing alcohol
- Approved surface preparation products
- Soap and water
Always follow the adhesive manufacturer's recommendations regarding cleaning products and preparation procedures.
Adding a Window to a Cargo Van
Many camper van conversions begin with a cargo van that has no side windows installed.
In these situations, the installer must create the opening.
Common cutting tools include:
- Body saws
- Air saws
- Reciprocating saws
- Metal cutting tools
The process begins by drilling an access hole large enough to accommodate the cutting blade, then carefully following the factory window stamping.
Cutting Tips
- Measure multiple times before cutting
- Verify interior clearances
- Protect surrounding paint surfaces
- Follow factory stamp lines carefully
- Cut the top section last whenever possible
Leaving the top section connected until the end can help prevent the panel from bending or dropping during cutting.
Preparing the Cut Edge
Once the opening has been created, all rough edges should be smoothed and cleaned.
Most builders will:
- File sharp edges
- Remove burrs
- Clean metal shavings
- Prime exposed metal
Protecting exposed metal is an important step in preventing future corrosion.
Edge Trim Considerations
Many installers choose to add edge molding around the cut opening.
Edge trim can:
- Improve interior appearance
- Cover raw metal edges
- Create a cleaner finished look
- Protect interior finishing materials
In some builds, interior wall panels completely cover the cut edge, making trim optional.
The choice depends on the overall design of the van conversion.
Why Dry Fitting Is Important
Before applying any primer or urethane, a complete dry fit should be performed.
This allows the installer to verify:
- Window placement
- Body alignment
- Clearance around the opening
- Visual appearance
- Tape reference points
Many installers use painter's tape as temporary alignment markers to simplify final placement once adhesive is applied.
Preparing for Urethane Bonding
Proper preparation is critical for a successful installation.
Most urethane systems use a primer to promote adhesion between the vehicle body and the urethane adhesive.
The primer is typically applied around the perimeter of the opening where the urethane bead will be placed.
Allow the primer to dry according to the manufacturer's instructions before proceeding.
Choosing the Right Urethane Gun
Automotive urethane is significantly thicker than standard household caulking materials.
As a result, many standard caulking guns are not suitable.
Professional-grade urethane guns typically feature:
- Higher thrust ratios
- Smoother application
- Better control
- Reduced user fatigue
Consistent application is one of the keys to achieving a leak-resistant installation.
Applying the Urethane Bead
When applying urethane, consistency is critical.
The goal is to create a continuous, uniform bead around the opening without gaps or thin spots.
Many installers position the urethane bead slightly away from the edge of the opening so that the adhesive remains hidden behind the glass after installation.
Benefits include:
- Cleaner appearance
- Reduced risk of visible squeeze-out
- More professional finished look
Large side windows often require multiple tubes of urethane, depending on the size of the opening.
Consistency Is Key
One of the most common causes of leaks is an inconsistent bead.
Installers should focus on maintaining:
- Consistent height
- Consistent width
- Continuous application
- Smooth transitions between tubes
Taking time during this step can significantly improve the final outcome.
Installing the Window
Having two people available during placement is highly recommended, especially for larger windows.
A common installation approach is:
- Align the bottom edge first.
- Verify front-to-rear positioning.
- Maintain a slight angle away from the vehicle body.
- Carefully rotate the glass into the urethane bead.
- Apply gentle pressure to seat the window.
Urethane adhesives develop strong initial tack quickly, making careful placement important.
Achieving Proper Alignment
Many OEM-style windows are designed to sit flush with the surrounding body contours.
The goal is typically to create a smooth visual transition from:
- Sheet metal
- Glass
- Sheet metal
Taking time during placement can help improve both aesthetics and long-term performance.
Securing the Window During Cure
Once the window is positioned correctly, tape is commonly used to hold the glass in place while the urethane cures.
Most installers place several strips of tape around the perimeter to prevent movement.
Additional tape may also help protect the urethane bead from contamination during the initial cure period.
Recommended Cure Time
Always follow the urethane manufacturer's instructions regarding cure times.
In general:
- A short initial set period is recommended before driving.
- Windows should remain undisturbed during curing.
- Vehicle washing should be delayed until the adhesive has fully cured.
Environmental factors such as temperature and humidity can influence cure times.
Common Mistakes to Avoid
- Skipping the dry fit process
- Applying inconsistent urethane beads
- Failing to clean surfaces properly
- Rushing window placement
- Ignoring body alignment
- Using the wrong application tools
- Driving before adequate cure time
Most installation problems can be avoided through careful preparation and attention to detail.
Why Buy Van Windows from Van Windows Direct?
Van Windows Direct specializes in windows designed specifically for modern van platforms, including:
- Mercedes-Benz Sprinter
- Ford Transit
- Ram ProMaster
- Universal van applications
Our products are trusted by DIY builders, professional conversion companies, fleet operators, and outdoor enthusiasts throughout North America.
We are committed to helping customers achieve successful installations and build vehicles that are both functional and visually impressive.
Explore additional resources: