

Professional Van Window Installation: How Suction Clamps, Ratchet Straps, and Precision Alignment Create a Cleaner Finished Look
Published by VWD on May 13th 2026
Professional Van Window Installation: How Suction Clamps, Ratchet Straps, and Precision Alignment Create a Cleaner Finished Look
Installing van windows is one of the most important upgrades in any camper van, work van, overland build, shuttle conversion, or professional upfit. A great window does more than add light and ventilation. It changes the entire look of the van.
But the final result depends on more than the window itself.
A premium van window still needs a thoughtful installation. Proper alignment, controlled spacing, and smart positioning techniques can make the difference between a basic install and a professional-looking install that appears clean, straight, and intentional.
At Van Windows Direct, we work with DIY builders, professional upfitters, commercial van builders, and installers across the country. One thing we see often is that experienced installers do not rely on guesswork. They use tools, references, and real-world techniques to help the glass sit correctly against the van wall.
Some of these methods are simple. Some are creative. Some are not required for every installation, but professionals commonly use them when a window needs extra control during positioning or curing.
Two of the most useful examples are suction clamps and ratchet straps.
Suction clamps can help hold, move, and fine-tune the window during installation. Ratchet straps, when used carefully with proper protection and light-controlled pressure, can help larger window panels follow the contour of the van wall while the urethane cures.
These techniques are not meant to force a window into place. They are used to help guide alignment, maintain position, and create a cleaner finished appearance.
Why Van Window Alignment Matters
Van window installation is highly visual. A window can be sealed correctly but still look off if it is not aligned with the body lines, door seams, or other windows on the van.
This matters even more when installing multiple windows in a row. A sliding door window, rear quarter window, bunk window, or fixed glass panel may look fine on its own. But once several windows are installed together, every line contributes to the overall appearance.
If one window sits slightly higher, lower, farther out, or at a different angle, the eye catches it immediately.
Good alignment helps improve:
- Exterior appearance
- OEM-style fitment
- Side profile consistency
- Window row symmetry
- Customer confidence
- Build quality perception
- Resale value
For premium van conversions, appearance matters. Clean window alignment communicates that the build was handled with care.
Van Walls Are Not Perfectly Flat
One of the biggest challenges with van window installation is the van body itself. The side of the van may look flat from a distance, but it usually is not.
Most modern vans have compound curves, stamped body panels, door transitions, reinforcement areas, and slight panel flex. These details affect how the window sits against the exterior wall.
This is especially true on larger vans such as Sprinter, Transit, and ProMaster platforms. Large windows have to work with the natural shape of the body. If the installer does not account for that contour, the finished result may show uneven gaps, proud corners, or inconsistent reflection lines.
This is why dry fitting is so important.
Before final installation, a professional installer will usually test the window position, check the body lines, inspect the reveal, and confirm that the window sits naturally against the panel.
For window options by van platform, visit the main Van Windows Direct van windows page.
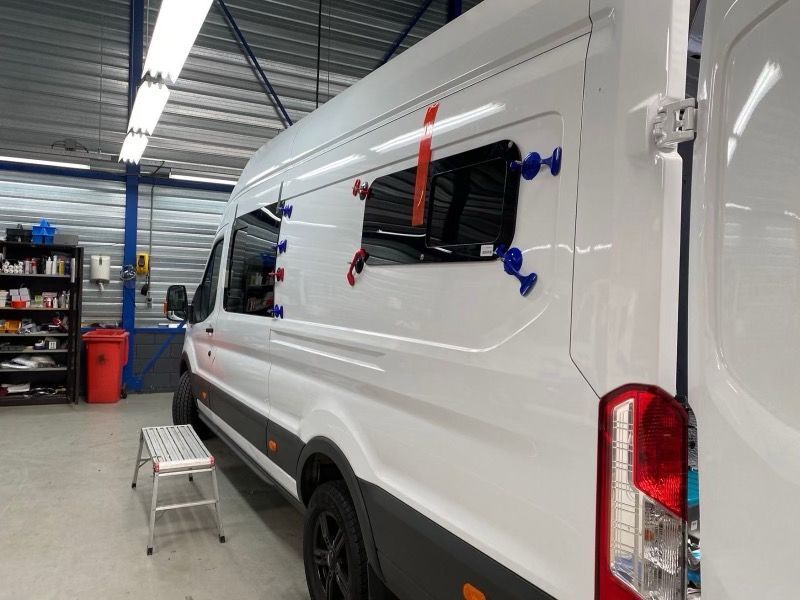
Why Professional Installers Use Suction Clamps
Suction clamps are one of the most valuable tools for van window installation. They allow the installer to control the glass more safely and accurately.
Large glass panels can be awkward to handle by hand. A suction clamp gives the installer a firm gripping point and allows small adjustments before the window is fully set.
Suction clamps can help with:
- Lifting the window into position
- Holding the glass steady
- Making small alignment adjustments
- Reducing accidental shifting
- Improving installer control
- Maintaining position while tape or clamps are applied
This is especially helpful on urethane-bonded windows. Once the urethane is applied and the window is placed, the installer has a limited amount of time to make corrections. Suction clamps make that process easier and cleaner.
For tools and install-related products, see van window installation tools.
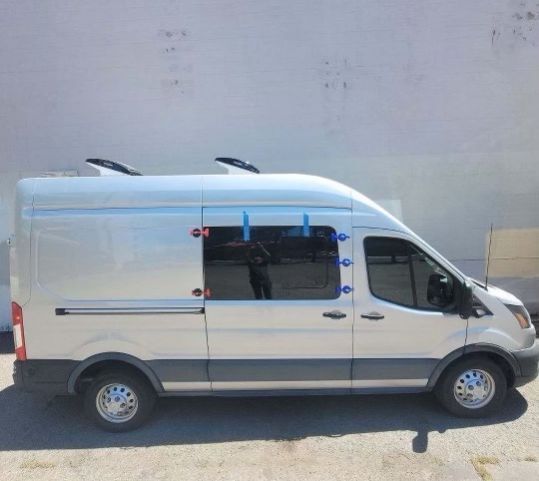
Using Suction Clamps for Multi-Window Alignment
When installing multiple windows on the same side of a van, suction clamps become even more useful.
For example, if a builder is installing a sliding door window and a rear quarter window, the two windows need to look like they belong together. The top line, lower line, spacing, and relationship to the body should be visually balanced.
Suction clamps allow the installer to step back, inspect the window position, and make small corrections before the final position is locked in.
Professional installers often combine suction clamps with:
- Painter’s tape reference marks
- Measuring points
- Laser levels
- Temporary spacers
- Visual checks from multiple angles
This is how a builder gets a clean side profile instead of a window row that looks uneven or rushed.
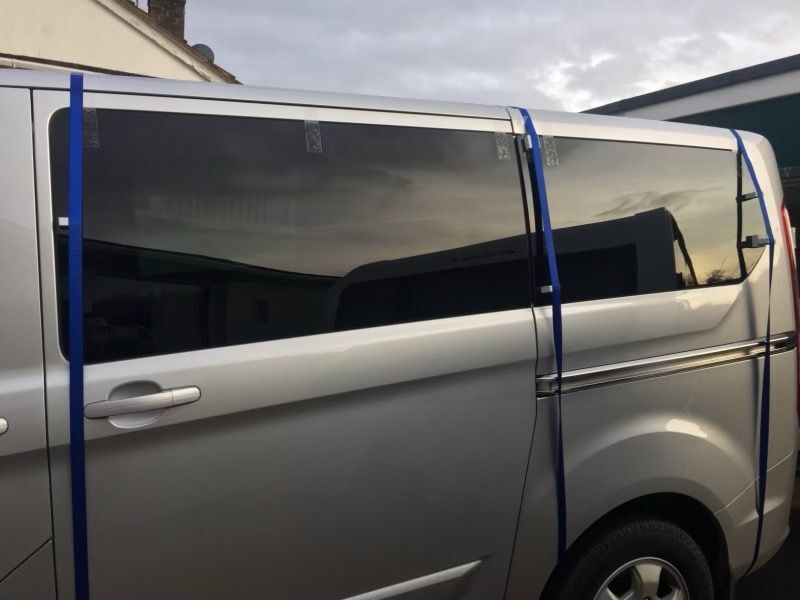
Ratchet Straps as a Controlled Alignment Method
Ratchet straps are an out-of-the-box method that many installers use when additional contour control is needed.
This method is not required for every install. It is not a replacement for proper prep, correct urethane application, or accurate placement. But on certain large windows, long panels, or curved body areas, a carefully placed ratchet strap can help hold the window closer to the van wall while the adhesive cures.
The key word is carefully.
The goal is not to crank the window down with force. The goal is light, controlled pressure that helps keep the window positioned while the urethane sets.
When used properly, ratchet straps can help:
- Improve contour matching
- Reduce corner lift
- Hold larger windows in position
- Maintain consistent spacing
- Improve visual fitment
- Support the window during cure time
Installers should always protect the glass, paint, trim, and body edges when using straps. Soft padding, clean contact points, and careful tension are critical.
Ratchet Straps Are for Positioning, Not Forcing
A ratchet strap should never be used to force a window into an unnatural position.
Tempered safety glass is strong, but it should not be put under unnecessary stress. Excessive pressure can create problems. It can squeeze out too much urethane, distort the intended spacing, or place stress on the edge of the glass.
The correct approach is controlled stabilization.
Use the strap to assist the installation, not overpower it.
If a window requires extreme pressure to sit against the van, something else may be wrong. The cutout, urethane bead, spacer setup, or window selection should be reviewed before continuing.
Why Urethane Thickness Matters
Urethane-bonded windows need a proper adhesive bed. If the window is pressed too tightly against the van wall, the urethane may become too thin in certain areas. If the window sits too far away, it may look proud or uneven.
A professional-looking install depends on a consistent urethane bead and proper glass depth.
This is why many installers use spacers, bumpers, or temporary blocks. These help maintain a controlled gap between the glass and the van body.
Good spacing helps:
- Protect the glass edge
- Maintain adhesive thickness
- Reduce uneven pressure
- Improve visual consistency
- Support long-term installation quality
For adhesives, trim, seals, and related products, visit installation accessories.
Dry Fit Before Final Installation
Dry fitting is one of the most important steps in any van window installation.
Before applying urethane, place the window against the van and inspect the fit. Check the opening, body contour, edge clearance, and overall appearance.
During dry fit, look for:
- Even reveal around the window
- Proper overlap on the exterior
- Correct position relative to body lines
- Correct position relative to other windows
- Contact points that may need spacing
- Areas where the body curve may affect fitment
This is the time to adjust. Once urethane is applied, every correction becomes more difficult.
Multi-Row Window Installs Need Extra Planning
Some van builds use multiple windows across the side of the van. This can create an incredible finished look when done correctly.
It can also expose small installation mistakes.
When installing multiple windows, installers should plan the full layout before cutting or bonding. Do not treat each window as an isolated install. Think about the complete visual line from front to rear.
Important reference points include:
- Top glass line
- Bottom glass line
- Door seam spacing
- Body crease alignment
- Window-to-window gap
- Rear quarter panel transition
When the windows are aligned correctly, the entire van looks more refined.
Fixed Glass Windows and Clean Exterior Styling
Fixed glass van windows are popular because they provide a clean exterior look, natural light, and privacy without a sliding panel. They are especially useful where ventilation is not required but appearance and visibility matter.
For builders seeking a clean factory-style appearance, fixed glass can be a strong choice.
See available options here: fixed glass van windows.
Sliding Windows, Awning Windows, and Bunk Windows
Different window styles have different installation considerations.
Sliding windows need to be positioned carefully so the operating section functions correctly and the window sits naturally in the panel.
Awning windows need clean alignment so the exterior glass, hinge area, and opening panel operate as intended.
Bunk windows often install in smaller areas, but they still need careful spacing and alignment to avoid a sloppy finished appearance.
With any window style, the installer should focus on both function and appearance.
Explore available options:
Using Tape as a Temporary Support Tool
Painter’s tape and exterior-safe tape are often used during installation to help mark position and stabilize the glass.
Tape can help:
- Mark alignment points
- Create visual guide lines
- Hold the window temporarily
- Reduce sliding during cure time
- Support suction clamp positioning
Tape should not be the only support method for a large or heavy window, but it is very useful as part of the total setup.
Installer Tips for a Cleaner Finished Look
For the cleanest installation, take your time and control the process.
Helpful tips include:
- Dry fit before applying urethane
- Use suction clamps for better glass control
- Mark reference points with tape
- Use spacers to maintain consistent depth
- Check the window from multiple angles
- Step back and inspect the entire side of the van
- Use controlled strap pressure only when appropriate
- Protect all painted surfaces and glass edges
- Do not over-tighten straps or clamps
- Allow proper cure time before removing supports
Common Mistakes to Avoid
Even a great window can look bad if the installation is rushed.
Common mistakes include:
- Skipping the dry fit
- Using an uneven urethane bead
- Pressing the glass too close to the wall
- Failing to account for van body curvature
- Not checking alignment with nearby windows
- Removing support too early
- Using excessive strap pressure
- Letting urethane squeeze out into visible areas
Most appearance problems come from lack of planning. A careful installer can prevent many of these issues before the window is ever bonded.
Professional Installation Is About Control
The best installers control every part of the process.
They control the cut. They control the urethane bead. They control the spacing. They control the alignment. They control the cure position.
Suction clamps and ratchet straps are simply tools that help with that control.
They do not replace skill. They support skill.
When used correctly, they can help produce a cleaner, straighter, more professional-looking van window installation.
Why Van Windows Direct
Van Windows Direct offers a wide selection of van windows for builders who care about appearance, fitment, and performance.
Our selection includes sliding van windows, awning van windows, fixed glass van windows, bunk windows, universal windows, installation accessories, trim options, adhesives, tools, and replacement parts.
Whether you are building a Sprinter, Transit, ProMaster, camper van, work van, or full custom conversion, the right window and the right install method matter.
A better window deserves a better installation.
Final Thoughts
A professional van window installation is not just about sealing a window on to a van. It is about creating a finished result that looks intentional, clean, and properly integrated with the vehicle.
Suction clamps, ratchet straps, spacers, tape guides, and careful alignment methods are all part of the professional installer toolkit.
They are not always required. They are not one-size-fits-all methods. But when used correctly, they can help improve alignment, contour matching, and final appearance.
For van windows, installation tools, urethane, accessories, and expert support, visit Van Windows Direct.