
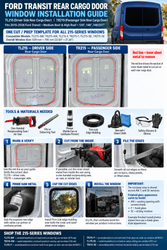
Ford Transit Rear Door Window Installation Guide | TL215 & TR215
Published by VWD on Oct 1st 2026
Ford Transit Rear Cargo Door Window Installation Guide
TL215 & TR215 Rear Door Windows for Medium Roof & High Roof Transit Vans
Installing rear cargo door windows on a Ford Transit requires more than simply bonding glass to the exterior door. On 2015–2026 Ford Transit Medium Roof and High Roof vans, you must remove and properly finish portions of the stamped inner sheet metal around the rear cargo door window pocket before installing the window.
This step-by-step Ford Transit rear door window installation guide covers the preparation process for the Van Windows Direct:
- TL215 — Driver Side Rear Cargo Door
- TR215 — Passenger Side Rear Cargo Door
The same general cut and preparation area is used across the VWD 215-Series rear cargo door window family:
- TL215-AW / TR215-AW — Premium Awning Windows
- TL215-F / TR215-F — Fixed Glass Windows
- TL215-SE / TR215-SE — SE-Series Sliding Windows
The current VWD product listings show these rear-door windows fitting 2015–2026 Ford Transit Medium Roof and High Roof vans with 130", 148", and 148" Extended wheelbases. The listed overall window dimensions are approximately 829 mm H × 795 mm W — 32.64" H × 31.30" W. Van Windows Direct
Table of Contents
- Ford Transit TL215 vs. TR215
- Which 215-Series window should you choose?
- Tools and materials
- Identify the inner sheet metal to remove
- Cut the inner sheet metal
- File and deburr the opening
- Prime the exposed steel
- Install Trim-Lok edge molding
- Clean the door cavity
- Dry-fit the window
- Prepare the urethane bond
- Install the window
- Common installation mistakes
- Frequently asked questions
- Shop TL215 and TR215 windows
Ford Transit TL215 vs. TR215
The VWD model prefix identifies which rear cargo door the window fits.
| Model Prefix | Position |
|---|---|
| TL215 | Driver Side Rear Cargo Door |
| TR215 | Passenger Side Rear Cargo Door |
The photos in this guide show the inner rear-door structure from inside the van.
The red line identifies the approximate area of inner stamped sheet metal that must be removed to create the required clearance for the window installation.
Treat the red line as an installation reference, not a precision cutting template.
Always verify the actual van and window before cutting.
Shop Ford Transit 215-Series Rear Cargo Door Windows
Driver Side Rear Cargo Door
TL215-AW Premium Awning Window
The TL215-AW is the driver-side Premium Awning rear cargo door window. It uses an outward-opening awning section with gas-strut support, an integrated retractable insect screen, a pleated UV shade, and privacy glass.
Shop the TL215-AW Driver Side Awning Window
TL215-F Fixed Glass Window
The TL215-F is the driver-side fixed-glass version, designed for a clean OE-style exterior appearance without moving components.
Shop the TL215-F Driver Side Fixed Glass Window
TL215-SE Sliding Window
The TL215-SE adds a sliding ventilation section with an integrated screen while maintaining the Transit-specific rear cargo door shape.
Shop the TL215-SE Driver Side Sliding Window
Passenger Side Rear Cargo Door
TR215-AW Premium Awning Window
The TR215-AW is the passenger-side Premium Awning rear cargo door window with an integrated retractable screen and UV shade.
Shop the TR215-AW Passenger Side Awning Window
TR215-F Fixed Glass Window
The TR215-F is the passenger-side fixed privacy-glass version.
Shop the TR215-F Passenger Side Fixed Glass Window
TR215-SE Sliding Window
The TR215-SE provides a passenger-side sliding ventilation opening and integrated screen.
Shop the TR215-SE Passenger Side Sliding Window
Which 215-Series Window Is Right for Your Transit?
All three styles use the same general rear cargo door position, but the finished functionality differs.
215-AW Premium Awning Window
The AW version is designed for builders who want ventilation along with an integrated screen and shade.
The current TL215-AW/TR215-AW product specifications list an overall size of approximately 829 mm × 795 mm with an awning opening of approximately 380 mm W × 420 mm H.
Choose the AW version when ventilation, privacy, and integrated interior finishing are priorities.
215-F Fixed Glass Window
The fixed-glass version provides the simplest configuration.
There are no sliders, struts, screens, or opening mechanisms.
This makes it a strong option for builders primarily looking for:
- Exterior visibility
- Additional natural light
- Privacy glass
- A clean OE-style appearance
- Minimal moving components
The current fixed-glass listings show overall dimensions of approximately 829 mm × 795 mm. Van Windows Direct
215-SE Sliding Window
The SE version adds a sliding ventilation section.
The current TL215-SE/TR215-SE listings show an overall size of approximately 829 mm × 795 mm, with a slider opening of approximately 410 mm × 218 mm.
The SE version is a strong option for builders who want simple, direct airflow from the rear doors without the larger integrated awning assembly.
Tools and Materials for Ford Transit Rear Door Window Installation
Before you begin, gather the tools you need to make a controlled cut and properly finish the opening.
Recommended tools include:
- One-handed reciprocating saw
- Pneumatic air saw
- Compact automotive body saw
- Thin-metal saw blade
- Hand file
- Deburring tool
- Safety glasses
- Gloves
- Vacuum
- Clean shop cloths
- Automotive primer or suitable corrosion-protection coating
- Trim-Lok edge molding
- Automotive glass urethane
- Appropriate urethane primer
- Masking or support tape
For urethane-bonded windows, VWD also offers installation kits designed for bonded van windows.
Shop the VWD Urethane Window Installation Kit
For rear cargo door-size bonded windows, VWD also offers a smaller urethane installation kit. Van Windows Direct
Shop the VWD Small Window Urethane Installation Kit
Step 1 — Identify the Inner Sheet Metal to Remove
Begin from inside the Ford Transit rear cargo door.
The stamped inner door structure surrounds the factory rear window pocket.
The red line in the installation images identifies the general section of inner sheet metal to remove to create clearance for the TL215 or TR215 window.
Before cutting:
- Confirm whether you are installing TL215 or TR215.
- Inspect the back side of the cutting area.
- Locate wiring harnesses.
- Locate lock rods and cables.
- Protect nearby painted surfaces.
- Confirm the window fits the specific rear-door position.
- Check that nothing important is directly behind the cutting path.
Important
Do not blindly follow an image without checking the actual van.
Production tolerances, previous repairs, bodywork, and small manufacturing variations can affect the final opening.
Step 2 — Cut the Inner Sheet Metal
Whenever practical, cut the sheet metal from inside the van.
Working from the interior provides better visibility of the stamped inner structure and helps reduce the chance of damaging the exterior painted surface.
Suitable cutting tools include:
- One-handed reciprocating saw
- Pneumatic air saw
- Compact body saw
Use a thin-metal blade.
Work slowly and deliberately.
Avoid pushing the blade unnecessarily deep into the door cavity because portions of the exterior door skin may be relatively close behind the inner panel.
Installation Tip
It is safer to leave a small amount of excess material and refine the opening afterward than to remove too much material on the initial cut.
Step 3 — Remove the Cut Sheet-Metal Section
Once you've cut the perimeter, carefully remove the unwanted section.
Avoid aggressively bending or twisting the panel against the remaining door structure.
After the section is removed, inspect the opening for:
- Remaining metal tabs
- Saw burrs
- Raised corners
- Jagged areas
- Sharp fragments
- High spots
The goal is a smooth, controlled opening that does not interfere with the finished window.
Step 4 — File and Deburr the Opening
Use a hand file or deburring tool around the complete perimeter.
Remove:
- Sharp burrs
- Lifted edges
- Saw marks
- High spots
- Jagged corners
The edge does not have to look like a factory-stamped opening.
It does need to be smooth enough that no raised steel interferes with the window frame, Trim-Lok, or final glass position.
This step also reduces the risk of exposed metal cutting an installer later in the build.
Step 5 — Protect the Exposed Steel
Don't leave freshly cut automotive sheet metal bare.
Apply suitable corrosion protection to the exposed raw edge.
Possible options include:
- Automotive rattle-can primer
- Touch-up primer
- Suitable bare-metal automotive primer
- Urethane-compatible primer where appropriate
Only the freshly exposed steel needs to be coated.
A light, controlled application is sufficient.
Allow the primer or coating to properly flash or dry according to the manufacturer's directions.
Step 6 — Install Trim-Lok Edge Molding
Once the metal is smooth and protected, install edge molding over the finished sheet-metal edge.
Trim-Lok provides several benefits:
- Covers sharp metal edges
- Improves appearance
- Protects the cut edge
- Helps conceal small cutting imperfections
- Creates a cleaner finished interior opening
Work the molding firmly over the sheet metal so it follows the curves without lifting.
Where both inner and outer sheet-metal layers are exposed, make sure the finished edge is properly protected and capped.
Step 7 — Clean the Door Cavity
Cutting steel creates metal shavings.
Do not leave these inside the rear cargo door.
Use a vacuum and a clean cloth to remove loose debris.
Pay special attention to the bottom of the door cavity.
Loose steel fragments can eventually rust and may discolor surrounding painted surfaces.
A magnetic pickup tool may also help collect small steel fragments.
Step 8 — Dry-Fit the TL215 or TR215 Window
Before opening the urethane, position the window in the prepared door opening.
Dry-fitting is one of the most important parts of the installation.
Inspect the entire perimeter.
The window should sit naturally in its intended rear-door pocket without requiring excessive force.
If the window contacts remaining sheet metal:
- Remove the window.
- Identify the interference point.
- Carefully remove only the material required.
- File the new cut.
- Re-protect any exposed raw steel.
- Dry-fit again.
Never use the glass or urethane bead to force a window past an improperly prepared opening.
Step 9 — Prepare the Urethane Bond
The TL215 and TR215 window families use urethane-bonded installation.
The current VWD product listings instruct installers to dry-fit the window, prepare the opening, treat exposed cut edges, clean and prime the bonding surfaces as required, apply automotive urethane, set the glass, support it during cure, and follow the urethane manufacturer's cure requirements. Van Windows Direct
VWD also publishes a separate urethane installation guide covering surface preparation, bead geometry, setting the glass, and cure timing. Van Windows Direct
Read the VWD Urethane-Bonded Van Window Installation Guide
Watch the VWD Urethane Van Window Installation Guide
Follow the instructions for the specific adhesive system being used.
Step 10 — Apply the Urethane
Prepare the glass and vehicle bonding surfaces according to the adhesive manufacturer's specifications.
Then apply a continuous automotive urethane bead.
Avoid:
- Gaps in the bead
- Extremely thin sections
- Low corners
- Inconsistent bead height
A continuous bead is essential for a proper weather-resistant bond.
Automotive urethane is significantly thicker than household caulk.
VWD recommends using a high-ratio urethane gun rather than a standard lightweight household caulking gun for easier application. Van Windows Direct
Step 11 — Install the Window
Carefully place the TL215 or TR215 window into the rear cargo door opening.
Apply even pressure around the perimeter.
Avoid pushing one corner excessively inward.
The goal is consistent urethane contact around the window while maintaining the intended exterior position.
Tape or otherwise support the window during cure according to the urethane manufacturer's instructions.
Do not drive the van until the adhesive has reached its specified safe-drive-away time.
Step 12 — Final Inspection
After installation, inspect the complete perimeter.
Look for:
- Consistent window position
- Proper contact with the urethane
- No visibly unsupported areas
- No trapped debris
- Proper Trim-Lok seating
- No exposed raw metal
- No interference with door hardware
Once the adhesive has fully cured, inspect the finished installation again before exposing the window to heavy water pressure.
Why Proper Rear-Door Preparation Matters
A Ford Transit rear door window installation is not simply about creating a hole large enough for the glass.
The window must sit against a properly prepared door structure.
Poor preparation can lead to:
- Window-frame interference
- Improper glass position
- Uneven urethane contact
- Sharp exposed edges
- Corrosion
- Increased installation difficulty
- Poor cosmetic results
Taking extra time to carefully cut, deburr, prime, edge-finish, dry-fit, and clean the opening makes the final installation considerably easier.
Common Ford Transit Rear Window Installation Mistakes
Removing too much metal
Only remove the material necessary to create proper clearance.
You can always enlarge the opening slightly later.
You cannot easily replace material you've already removed.
Skipping the dry fit
Always test the actual window before applying urethane.
Leaving burrs
Raised sheet metal can prevent proper seating.
File the complete perimeter.
Leaving bare steel
Freshly cut steel should receive corrosion protection.
Leaving metal debris inside the door
Vacuum the door thoroughly after cutting.
Using household adhesive
These windows are designed for automotive urethane bonding.
Using the wrong caulking gun
High-viscosity automotive urethane can be extremely difficult to dispense with a standard household caulking gun.
Driving before the urethane is cured
Follow the safe-drive-away time specified by the adhesive manufacturer.
Related Ford Transit and Van Window Resources
If you are planning a larger van conversion, these VWD guides may also be useful:
Rear Cargo Door Windows for Sprinter, Transit and ProMaster
This VWD guide compares rear cargo door window configurations and explains how rear-window ventilation fits into a complete van build. Van Windows Direct
Direct-Fit Urethane Van Window Installation Guide
Van Window Urethane & Primer Products
These internal links strengthen the relationship between the installation article, the windows, and the supporting installation products. Van Windows Direct
Frequently Asked Questions
What Ford Transit vans do TL215 and TR215 windows fit?
Current VWD product listings show the 215-Series rear cargo door windows fitting 2015–2026 Ford Transit Medium Roof and High Roof vans with 130", 148", and 148" Extended wheelbases. Van Windows Direct
Which side is TL215?
TL215 is the driver-side rear cargo door.
Which side is TR215?
TR215 is the passenger-side rear cargo door.
What size are TL215 and TR215 windows?
The current fixed-glass 215-Series listings show an overall size of approximately 829 mm × 795 mm — 32.64" × 31.30". Van Windows Direct
Do I need to cut the inner Ford Transit rear door sheet metal?
For the installation shown in this guide, portions of the stamped inner rear-door structure need to be removed to provide clearance for the window.
Should I cut from inside or outside the van?
When practical, cutting from inside the van generally provides better visibility of the inner stamped sheet metal and reduces the risk of damaging the exterior painted surface.
Should freshly cut steel be primed?
Yes. Raw exposed steel should receive suitable corrosion protection before the installation is completed.
Should the window be dry-fitted before applying urethane?
Yes. Always verify the window fits properly before applying adhesive.
What adhesive should be used?
The TL215 and TR215 products use automotive urethane-bonded installation. Van Windows Direct
Shop Ford Transit TL215 & TR215 Rear Cargo Door Windows
Driver Side
TL215-AW Premium Awning Window
Passenger Side
TR215-AW Premium Awning Window